Tuesday, September 1, 2020

Camping in West Virginia

We just spent about a week on the road camping in West Virginia.  This let us get back out exploring a bit without straying too far in case pandemic things went haywire.

Our first stop was Battle Run Campground, a Corps of Engineers campground on Summersville Lake.  This was a beautiful campground, and would be especially good for boaters (they had anchor points for boats right next to many of the campsites).  Unfortunately I booked this so late that I think we got the absolute worst spot on the campground (site 109, right behind the check in building), but even so we could still see the lake.  

See?  Lake is visible in the background :-)

There were several things to see in the immediate area - first we went to Carnifex Ferry Battlefield State Park, a Civil War battleground just around the corner.  It has one of the most beautiful overlooks we've seen in a while - visible without even having to hike!

Overlook at the picnic area parking lot

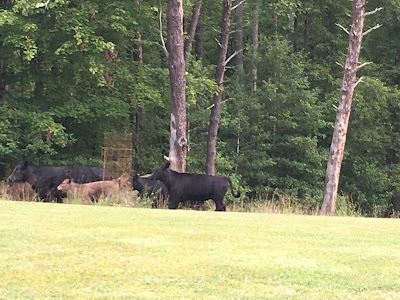
We took the Patterson Trail along the edge of the park and learned about the battle (which, honestly, seemed mostly unremarkable).  We saw a couple more beautiful overlooks and witnessed a 'stampede' of some very noisy cattle.  


After the state park, we drove down to the Summerville Lake dam.  This dam was put in place for flood control and provides additional benefits of low flow supplementation for the river downstream and hydropower at a small facility.  

This is one of the original turbines that failed

Sitting atop the dam looking down at the hydropower plant

We hiked the Long Point trail to see another view of the lake from some rocks Aaron enjoyed risking his life on.

Contemplating how much farther he could go

Panorama from the overlook we eventually reached

After a couple days in the Summersville Lake area, we headed south just a little bit to camp at Little Beaver State Park.  This was a nice, mostly wooded campground near a small lake with a dam with a pretty outfall.


While we were here, we went to several sights in the New River Gorge National River park.  We went up to the main overlook for the New River Gorge Bridge, the longest steel span in the Western hemisphere.  Although most of the visitor centers are closed due to COVID-19, they did have a ranger stationed outside the main overlook to answer questions, hand out park maps, and (most importantly!) provide stamps for your National Park Passports.

At the main overlook

We decided to take the 45 minute drive to the bottom of the gorge and back out, which was WELL worth the trip.  This route traced the original route all travelers had to take before the famous bridge was built.  The bridge, according to the signs, reduced a 45 minute trip to 45 seconds.

View from the bottom - we were standing on the replica of
the original bridge looking up at the new bridge

Later we visited the Sandstone Falls, still in the very large New River Gorge National River's park.  The overlook for the falls is easily accessible just off of I-64, and the falls look rather unimpressive from that height, so we almost decided not to take the 40 minute drive down the gorge and across the river to see them up close.  Thank goodness we did go though!  They were much more impressive up close.  The observation boardwalk is nice, but of course Aaron had to go 'off-roading' a bit to get the full up close view.

Midway through our exploration for the path to the best view
of the falls

Panorama of the falls from our ultimate vantage point

The photos really don't do the falls justice, they were beautiful and quite impressive stretched across the entire width of the New River.

Our final stop in the New River Gorge National River was the Grandview overlook.  We first tried early in the morning after an intense rain and had NO luck, but came back later in the day to a beautiful view.

Nothing to see here!

A beautiful view later in the day

Back at our campsite, Aaron came up with an innovative bellows to help our campfire grow...I just had to share.


My hair dryer is only slightly worse for the wear.  Of course while you're RVing the maintenance is ever-present, and while we were out Aaron installed a backflow preventer on our shower after seeing it recommended on Fate Unbound's YouTube channel.  We have a cutoff on our shower head to quickly turn the water off while we're sudsing up while we're not on sewer, but because the higher pressure cold water seeps back into the hot water line while the water is off, cutting the water back on always causes a burst of cold water before the temperature returns to normal.  Installing the backflow preventer (aka check valve) on the hot water feed to the shower stopped this!

Installing the valve via the handy panel
in our bedroom.

Aaron also finally fixed the slow leak in our propane tank before we filled up at U-Save Propane near Summersville Lake.  This is the first time we filled our propane tank, and we were amazed at how quick and easy it was!  We left with a full tank of propane not even 30 minutes after driving on the property.

It was so nice and refreshing to get back on the road!  We returned the RV to the family farm after our adventure, with a renewed commitment to get back on the road permanently as soon as we can.

Tuesday, August 25, 2020

New Parking Site Complete!

 Big news!  My parents hired contractors to complete our new parking space at the farm and it looks GREAT!

Freshly poured concrete

With this in place, we will finally be able to come and go from the farm regardless of any recent rain saturating the ground!  Thanks Mom & Dad!!

Knowing we had solid ground to come back to, we finally took the RV in for its annual preventative maintenance and to get the air system examined.  Conveniently there was a Freightliner service shop just up the road in Beckley - Matheny Motors.  These guys were great!  They were happy to talk to Aaron at length on the phone and in person about his concerns and to explain their findings.  The preventative maintenance was straightforward of course.  They were also able to fix the air ride system.  We had noticed quite some time ago that when the air bags in the air ride system were inflated, the RV would lean toward the passenger side (when the air bags were not inflated, the RV sat flat).  After investigation, the mechanics determined that two suspension valve connectors were broken, which was preventing the air system from automatically compensating for changes in loading and terrain.  They replaced these connectors and now the RV rides level!  It also responds much better going around curves - Aaron used to worry we would roll with the lean when we turned. 

We also asked them to look at the air dump, which hasn't ever worked.  The mechanics concluded on this that the wrong valves were installed for the air dump, and also that the switch from the air dump button to the solenoid for the air valves wasn't hooked up.  Because all of the valves were wrong and looked OLD, the mechanic's professional opinion was that they never hooked up the air dump at the factory!  This is crazy to us - why have an air dump button on the driver's console if it doesn't work?? - but we have no reason to doubt his opinion.  It would be pretty expensive to replace the valves with the correct ones, AND the mechanic advised that Aaron could actually do that repair himself, so we decided not to complete that at the service center.  This also really impressed us - not only did they tell us we could do the work ourselves, but when we picked the RV up they actually walked Aaron through the process before we drove away.

Learning about valves at Matheny Motors (that's Aaron in the
Hokie Maroon and the head mechanic in the dark blue).

When we came back to the farm, we got to use the new parking spot for the first time - beautiful!

Perfect fit!

Now we're ready to come and go on some short trips!  Stay tuned!

Monday, July 27, 2020

New Parking Site: Electricity Complete!

Aaron and my dad have made great strides the past week with the new parking area!  Over a few days' work they were able to complete the rewiring needed to provide 50 amp power to the new parking area.

We are very fortunate that for whatever unknown reason my grandfather had run a very thick 200+ foot wire from the chicken coop to the tractor shed where we're setting up the new parking spot.  This wire far exceeds the specifications needed to transfer the power we required.  Thus the electrical project had two basic steps: first, upgrade and replace the breaker panels and under-rated wire between the garage and the chicken coop, and second, upgrade the breaker panel at the garage and run a new wire to the new parking location.  

We wanted all the new wire run between buildings to run underground, so the first step was to cut a trench from the garage to the chicken coop, which my dad accomplished in pretty short order with a spade and post-hole digger.

The trench from the chicken coop 
(foreground) to the garage (background).

Aaron hooked up the new circuit breaker inside the garage and ran wire through a hole in the back of the garage, down the new trench, and up the side of the chicken coop to a new breaker box there.  

Hooking up the new circuit breaker
panel in the garage

Routing the wire through the new box
on the outside of the garage - it was 
HARD work getting that thick wire to
turn the corner!!

Wire routed!

Additionally, they took the existing wire that used to run up to a connection point atop a pole and ran it through another trench to connect at the new breaker on the chicken coop.

Working on taking the existing wire
off the old rotting pole

Running the wire through the trench from the pole
to the chicken coop and hooking it to the new 
circuit breaker panel

They finished this work in just two days.

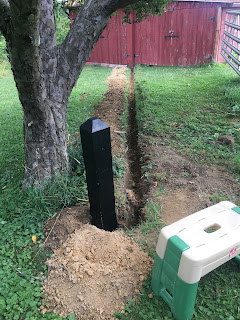
Next it was time to upgrade things at the tractor shed.  My dad again went out and dug the trench with a spade and post hole digger.

Trench from our parking spot 
(foreground) to the tractor shed
(background)

Aaron upgraded the fuse box inside the shed to a breaker panel and then they ran a wire out to a post my dad set in the ground.  Aaron affixed a new RV receptacle to the post, with switches for each of the new outlets: 50A, 30A, and 20A.

Working on wiring inside the tractor 
shed

Finishing up the wiring for the RV
receptacles

It's our own personal little campsite!  At this point we could actually go ahead and move the RV near this new panel for better ease of getting on and off the farm, even without the concrete pad in place.  We haven't moved the RV yet, but if we decide to take a quick camping trip somewhere we'll go ahead and park it near the new location.  

We're waiting now for quotes from some folks to put in the concrete pad at the new location.  The quotes will determine how much of that work my dad and Aaron will do themselves and how much will get hired out...stay tuned!

Saturday, July 18, 2020

Finishing Fiberglass, Shock Absorbers, and a Big New Project

It's been a while since I've posted...simultaneously it seems that so much and so little has happened.  On the so much side, of course the pandemic has taken a turn for the worse here in the USA...I just looked back on my last post and my optimistic comments "We're keeping an eye on national park, state park, and RV campground re-openings and we hope we'll be able to get back on the road soon-ish.  After these repairs, mostly all the must-do things we have left on the RV are retouching paint in various places, so conveniently we're nearly ready to go from a repair standpoint as well."...needless to say with the virus surging most places and some states rolling back their reopening plans, our plans to get on the road are being rolled back as well.  Though RVing is the latest craze now, committing to being full time on the road seems dangerous when you never know when the state you're in might decide to close campgrounds...or just close them to non-residents.  We're hoping we can start making some short trips soon... more on that later.

On the so little side, as I did mention in my last post we're nearing the end of things we hoped to accomplish while at my parents' farm.  Aaron did finally finish the fiberglass patching job under the bedroom slide, and so far it's looking great!

Filled, smooth, and ready for paint

Prepping the surface

All done and painted!

We also finished patching and painting the smaller spots on the rear of the RV.  We ordered special paint that promised to match our colors exactly - this was taken just after painting so it hadn't quite dried to the final color yet.


Aaron also decided to replace the shock absorbers and some kind of rods under the front of the RV.  Our ride has been fairly rough and he believes (I think rightly so) these were the culprits.  First he ordered new shock absorbers and got them installed with a LOT of banging to break rust welds holding them in place.

Breaking the old shock absorber loose using an 
old flywheel puller my grandfather made

Old shock absorber finally out

It was a tight fit under the wheel well!

Installed!

Aaron had also ordered some new rubber bumper for some kind of rod...I think Freightliner (the manufacturer of our frame) called it a down rod?  This thing:


It is part of the suspension somehow.  It turns out that this was bent and cracked (you can see the bend in the picture) and broke when Aaron took it out to replace the rubber bumper.  All the components were rusted together...it was in bad shape.  You can't really tell where the rubber bumpers go in the photo because they're basically totally missing.  So, since this was broken, we had to order ANOTHER part from Freightliner and Aaron had to install that.

Working on the install

Freshly installed!

So, with all these installs, our ride should (theoretically) be a LOT smoother when we finally do get back on the road.

Now finally...speaking of getting back on the road, we (with my dad) have started on a BIG new project on the farm!  My dad decided he wanted to make sure we can get the RV to the farm even if the field we've been driving across is non-driveable, so he's been working on some upgrades!  First, a new concrete parking area at the end of the driveway - so we don't have to drive across soil to park the RV.  So far we've outlined the area we want to pour concrete and my dad has moved the fence back from that area.

The poles outline the edges of the concrete space.
We'll have two series of concrete pads as wide as the
dirt you see, between the two posts at the front 
of the picture.

The old fence went by the trees; the new path
will connect the post in the foreground to the 
slim post you see midway back.

As a first step my dad rebuilt the gate support

My dad's talking to a company about getting concrete poured once we get the path dug up.

The second part of this was filling in the huge dip at the foot of the driveway.  Both times we've come in the driveway the frame has scraped bottom, roughing away some of the metal.  My dad already had some contractors come out to fill it, and it looks great!

Before: see the dip illustrated by the straight beam

After: so flat!!!

Today Aaron and Dad are looking at rerunning some wires to provide electricity hookups to the new parking location.  


And the GREAT news on this is that as soon as the concrete pad is finished, we'll be able to move the RV to the new location and start taking some short trips locally to some nice socially isolated campsites in nearby state and national parks...assuming there's still room at them!  We're hoping that if we travel Monday-Friday and come back for the weekends we'll be able to find some sites.  It's not quite the life we anticipated, but there are still plenty of places to visit near here that we haven't been, and will keep us close enough to the farm to beat a hasty retreat if we need to.  

Monday, June 8, 2020

Some things open! Fiberglass & hydraulic jack repairs

We were finally able to get out and 'explore' the local area now that the George Washington and Jefferson National Forest is back open!  I put 'explore' in quotes because of course we grew up here so we're not exploring anything new...still, it was nice to get in some real hiking.  Two local favorites in the national forest, Pandapas Pond and the Cascades, opened in the past few weeks, and we went to both!  We'd been to the easy Pandapas Pond hike a few times in the past couple years, but we hadn't been to the Cascades in quite a long time...possibly since we moved to England.

Cascades Waterfall

The weather continued to be mostly hit or miss, but when we had a few hours Aaron worked on some repairs on my parents' house - replacing a broken motion sensor light, patching a wall, and fixing the carburetor on a snowblower.

Replacing the motion sensor light


Helping my dad patch a hole on the outside wall


Working on the snowblower


When the weather WAS looking reliably nice for a full day, we headed up to the farm to work on the RV.  Aaron has been working on two major projects: fixing the fiberglass that I re-broke (oops!) and straightening the front hydraulic jack that seemed to have been damaged by the previous owners.

First the broken fiberglass...so, way back when we purchased the RV, we noticed a patched crack under the corner of the bedroom slide.  It was patched with some kind of glue.  We thought it was an odd place for a crack, but the glue was holding, so we didn't worry too much about it.  Then one day I brought the bedroom slide in...not checking the area carefully enough.  A curtain rod that I use to dry clothes was on the floor and managed to lodge itself between the incoming slide and the opposite wall.  Then...craaaaack!  So then we knew how the initial crack happened...and I had reopened it and broken the glue seal.  Aaron tried to re-glue/caulk it before we got on the road in the fall, but it didn't stick with the changing temperatures over the coming months.  So, he's working on a permanent solution that will be more resilient to shrinking and swelling.  

First step: insert metal beneath the fiberglass

Screw the fiberglass to the metal and 
file down the bolt heads

Add lots of epoxy

He still needs to fill in the hole and add a fiberglass cover, but each of these stages needs to dry at least overnight so it is slow going.  He also worked on some minor fiberglass repairs on the rear bumper.


The other big project was straightening the front hydraulic jack that supports the RV.  This was a bit crooked when we purchased the RV and has been on Aaron's list for a while.  My dad helped with fabricating a bracket to pull the jack forward and stabilize it against the frame.  Now that they're finished, the jack is completely straight!

Sizing the bracket

The finished bracket my dad made

Nice and straight!

Close up from under the RV.  
You can see the bracket, the pipe they
attached to keep the bracket in place,
and the rods that stabilize the whole
shebang against the frame.


We're keeping an eye on national park, state park, and RV campground re-openings and we hope we'll be able to get back on the road soon-ish.  After these repairs, mostly all the must-do things we have left on the RV are retouching paint in various places, so conveniently we're nearly ready to go from a repair standpoint as well.